Android backups with adb
Android Debug Bridge (adb) is a command line tool that can be used
to manage Android devices over USB. This post is going to go over using adb
to backup and restore application data.
Installing adb
On Debian the adb command can be installed from the official repositories
using apt-get:
sudo apt-get update
sudo apt-get install android-tools-adb
Alternatively the android-tools package can be used on recent Fedora or CentOS systems:
sudo yum install android-tools
Note: EPEL needs to be configured on CentOS.
For Windows and Mac systems, the easiest way to get access to adb is to
install SDK-Platform-Tools from Google.
Enabling USB debugging
Before connecting to an Android device USB debugging needs to be enabled. To do this select Developer options from the device system settings and enable the USB debugging option:
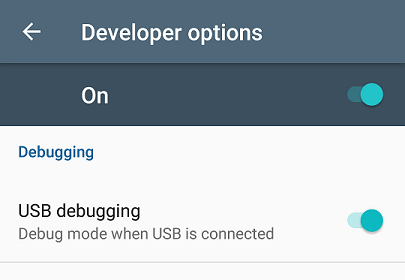
Note: on Android 4.2 and up the Developer options menu is hidden. To enable it select About phone from the device system settings and tap the Build number seven times. The developer options should now be available on the system settings screen.
Connecting adb
Once you've installed adb and enabled USB debugging, connect the device via a
USB cable and run sudo adb devices -l:
$ sudo adb devices -l
* daemon not running. starting it now on port 5037 *
* daemon started successfully *
List of devices attached
FB21AA891M             offline usb:1-2
This will start up the adb daemon and should list the connected device. On
the device you also need to allow the connection:
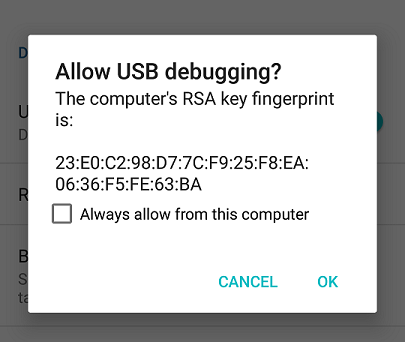
Once this is done the device should be online:
$ sudo adb devices -l
List of devices attached
FB21AA891M             device usb:1-2 product:F5121 model:F5121 device:F5121
Note: if you want to avoid having to use sudo, make your user account a
member of the adb group.
Backing up application data
Once the device is online application data can be backed up with the backup
command:
$ sudo adb backup -f portknocker.ab com.xargsgrep.portknocker
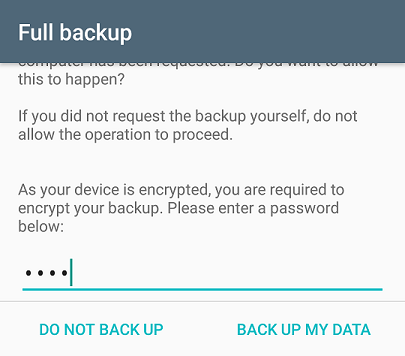
Now unlock your device and confirm the backup operation.
As suggested you will then need to confirm the backup on the device:
The command above will create a backup file called portknocker.ab with the
data from the com.xargsgrep.portknocker application. You can get a list of
installed applications using adb shell:
$ sudo adb shell pm list package
package:com.sony.nfx.app.sfrc
package:com.sonyericsson.android.techmode
package:com.sonymobile.whitebalance
package:com.android.cts.priv.ctsshim
package:com.google.android.youtube
package:com.ghostsq.commander
...
There are also additional options such as -apk which can be used to control
which data is backed up. Interestingly I had to add single quotes to use these
options:
$ sudo adb backup -f portknocker.ab '-apk com.xargsgrep.portknocker'
Now unlock your device and confirm the backup operation.
Note: if the single quotes are not used the backup will fail silently. This
can be verified using adb logcat to tail the device logs:
$ sudo adb logcat
08-17 22:51:36.289 17264 17264 D AndroidRuntime: Calling main entry com.android.commands.bu.Backup
08-17 22:51:36.289 17264 17264 D bu      : Beginning: backup
08-17 22:51:36.291 17264 17264 W bu      : Unknown backup flag -apk:com.xargsgrep.portknocker
08-17 22:51:36.292 17264 17264 E bu      : no backup packages supplied and neither -shared nor -all given
08-17 22:51:36.292 17264 17264 D bu      : Finished.
Full documentation on the additional options can be found on the Android command adb docs.
Restoring backups
Backups can be restored using the restore command:
$ sudo adb restore portknocker.ab
Now unlock your device and confirm the restore operation.
Note: backups which were created without the -apk option failed to
restore silently. Unfortunately I'm not quite sure why this happens...