Getting started with Pelican
Pelican is a static site generator in a similar vein to other tools like Jekyll. It's written in Python, and is a great way to quickly publish a website when combined with hosting services like GitHub Pages.
Installing Pelican
As with most Python projects it's a good idea to create a new virtual environment before installing packages. For Python 3 this can be done with the venv module:
$ python -m venv new_venv
$ source new_venv/Scripts/activate
Once the environment has been created and activated, Pelican can be installed
from PyPI using pip:
$ pip install pelican
Collecting pelican
  Using cached pelican-3.7.1-py2.py3-none-any.whl
Collecting six>=1.4 (from pelican)
  Using cached six-1.11.0-py2.py3-none-any.whl
Collecting unidecode (from pelican)
  Using cached Unidecode-0.04.21-py2.py3-none-any.whl
Collecting feedgenerator>=1.9 (from pelican)
  Using cached feedgenerator-1.9.tar.gz
Collecting python-dateutil (from pelican)
  Using cached python_dateutil-2.6.1-py2.py3-none-any.whl
Collecting jinja2>=2.7 (from pelican)
  Using cached Jinja2-2.10-py2.py3-none-any.whl
Collecting pytz>=0a (from pelican)
  Using cached pytz-2017.3-py2.py3-none-any.whl
Collecting pygments (from pelican)
  Using cached Pygments-2.2.0-py2.py3-none-any.whl
Collecting docutils (from pelican)
  Using cached docutils-0.14-py3-none-any.whl
Collecting blinker (from pelican)
  Using cached blinker-1.4.tar.gz
Collecting MarkupSafe>=0.23 (from jinja2>=2.7->pelican)
  Using cached MarkupSafe-1.0.tar.gz
Installing collected packages: six, unidecode, pytz, feedgenerator, python-dateutil, MarkupSafe, jinja2, pygments, docutils, blinker, pelican
  Running setup.py install for feedgenerator ... done
  Running setup.py install for MarkupSafe ... done
  Running setup.py install for blinker ... done
Successfully installed MarkupSafe-1.0 blinker-1.4 docutils-0.14 feedgenerator-1.9 jinja2-2.10 pelican-3.7.1 pygments-2.2.0 python-dateutil-2.6.1 pytz-2017.3 six-1.11.0 unidecode-0.4.21
Content for pelican can be written in reStructuredText, Markdown, or AsciiDoc formats. The example in this post is going to use Markdown, so the markdown module also needs to be installed:
$ pip install markdown
Collecting markdown
  Using cached Markdown-2.6.9.tar.gz
Installing collected packages: markdown
  Running setup.py install for markdown ... done
Successfully installed markdown-2.6.9
If everything goes well the pelican command should now be available:
$ pelican --version
3.7.1
Using pelican-quickstart
The pelican-quickstart command can now be used to set up a skeleton site.
This script will prompt for several details:
$ pelican-quickstart
Welcome to pelican-quickstart v3.7.1.

This script will help you create a new Pelican-based website.

Please answer the following questions so this script can generate the files
needed by Pelican.


> Where do you want to create your new web site? [.] example-site
> What will be the title of this web site? Example
> Who will be the author of this web site? Floating Octothorpe
> What will be the default language of this web site? [English]
> Do you want to specify a URL prefix? e.g., http://example.com   (Y/n) n
> Do you want to enable article pagination? (Y/n) n
> What is your time zone? [Europe/Paris] Europe/London
> Do you want to generate a Fabfile/Makefile to automate generation and publishing? (Y/n) n
> Do you want an auto-reload & simpleHTTP script to assist with theme and site development? (Y/n)
Done. Your new project is available at C:\Users\user\Desktop\example-site
Once the details have been filled in you should now have a site directory with the following files:
content: the directory source content for articles should be stored (e.g. Markdown files).output: the directory generated HTML will be written to.develop_server.sh: a script to set up and run a local development server.pelicanconf.py: the main Pelican configuration file.publishconf.py: a Pelican configuration file used before publishing a site.
Creating content
Once pelican-quickstart has been run, the develop_server.sh script can be
used to start a local development server:
$ ./develop_server.sh start
Note: if you get and error similar to python3: command not found the PY
variable can be used to override the name of the Python interpreter to use.
Content can now be created in the content directory. For the example in this
post I created the following files:
content
+-- images
¦   +-- logo.png
+-- example.md
Pelican uses metadata to manage content. At a minimum setting Title and
Date is a good idea. This can be done with lines similar to the following:
Title: Hello world
Date: 2017-11-23
This info was added at the start of example.md before the page content.
Additional info on metadata is available in the Pelican
docs.
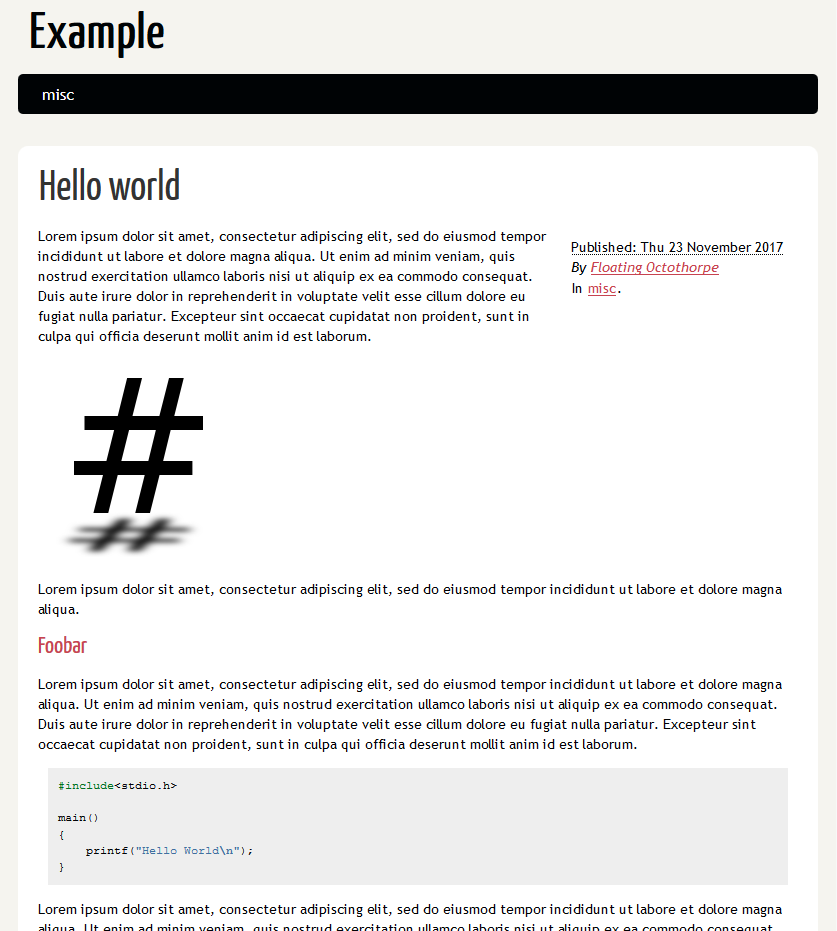
Once the files are created, Pelican should automatically populate the output
directory with the updated static content. If everything goes well it should
be possible to view the content in a web browser by visiting
http://localhost:8000/:

