Getting started with Radicale
Radicale is a CalDAV (calendar) and CardDAV (contact) server written in Python. It can be used to quickly stand up a shared calendar which can be accessed with a wide range of clients. This post is going to go through standing up Radicale on a Raspberry Pi running Raspbian.
Installation
Radicale is available from the standard Raspbian repositories. Therefore
installation is just a case of running apt-get:
sudo apt-get update
sudo apt-get install radicale
Basic configuration
By default almost everything in the main configuration file,
/etc/radicale/config, is commented out. The exception being the
filesystem_folder option.
The commented out configuration matches the default values Radicale will use when starting. Therefore it's worth having a read through the defaults. The Radicale docs go over the available configuration options, however below are some of the key options:
[server]
host = 0.0.0.0:5232
ssl = False
By default Radicale will bind to all IPv4 addresses and listen on TCP port 5232. It's also worth noting that TLS/SSL is disabled by default.
[auth]
type = None

[rights]
type = None
Radicale supports a range of different authentication methods, however by default no authentication is setup and unauthenticated users have full access to calendars.
[storage]
filesystem_folder = /var/lib/radicale/collections
Radicale will by default store calendars as files in
/var/lib/radicale/collections. It is however possible to use a database as a
back-end.
For the time being we are going to accept the defaults, however it's worth being aware no encryption or security is enabled out of the box!
Enabling and start Radicale
Radicale can be started using systemctl:
sudo systemctl start radicale.service
Assuming Radicale starts without any problems, you should also configure it to
start at boot. This is done by uncommenting ENABLE_RADICALE=yes in
/etc/default/radicale:
sudo sed -i -r 's/^#(ENABLE_RADICALE=yes$)/\1/' /etc/default/radicale
Connecting with Thunderbird
Radicale has setup instructions for quite a few different calendar applications. This post is going to go over setting up the Lightning addon which ships with Thunderbird.
-
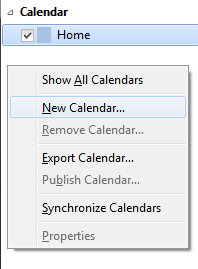
Start by creating a new calendar. This can be done by right clicking and selecting new calender:
-
Select "On the Network".
-
Select "CalDAV" and enter the URL of the Radicale server. The path (
/user/calendar.ics/) will be created if it does not exist: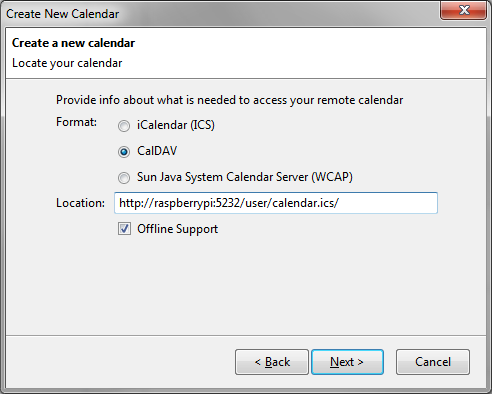
Note: the trailing
/in the URL is required! -
Finally give the calendar a name.
If the steps above worked correctly, Thunderbird should now be able to create
calendar events which will sync with Radicale. To make sure everything is
working as expected, check the Radicale log (/var/log/radicale/radicale.log).
It should have entries similar to the following:
2017-05-04 22:37:14,193 - INFO: PROPFIND request at /user/calendar.ics/ received
2017-05-04 22:37:14,360 - INFO: OPTIONS request at /user/ received
Next steps
Although the default configuration does work out of the box, the Calendar traffic is neither encrypted or authenticated. The next post is going to look at correcting this.