Automating Debian installation using preseeding
In a previous post I went over automating a CentOS installation using a kickstart file. This post is going to look at a similar technique called preseeding which can be used to do the same thing for Debian based distributions.
Note: like the previous CentOS example, the example given in this post is a VM being run under VirtualBox.
Creating a preseed file
One way to generate a preseed file is using the
debconf-get-selections command. First make sure the
debconf-utils package is installed:
apt-get install debconf-utils
Then create a new preseed file:
echo "#_preseed_V1" > preseed.cfg
debconf-get-selections --installer >> preseed.cfg
debconf-get-selections >> preseed.cfg
Although you can make a preseed file this way the resulting file will still need manual intervention. Generally it's a better idea to start with the example configuration provided by Debian:
wget -O preseed.cfg https://www.debian.org/releases/squeeze/example-preseed.txt
Customising
Although the example configuration is a good starting point, there are several changes I had to make before the installation was completely automated. You will likely want to make different changes, however feel free to refer to the preseed config used in this post.
Locale and keyboard layout
Set the locale and keyboard layout to match your location:
d-i debian-installer/locale string en_GB.UTF-8

d-i console-keymaps-at/keymap select gb
d-i keyboard-configuration/xkb-keymap select gb
Mirror URL
Update the mirror URL to a suitable mirror
d-i mirror/http/hostname string ftp.uk.debian.org
Note: a full list of mirrors can be found on debian.org.
User accounts
For the sake of simplicity this post is just going to create a root account
and skip creating a non root user. This can be done with the following
configuration:
d-i passwd/make-user boolean false
d-i passwd/root-password password example
d-i passwd/root-password-again password example
Note: use the passwd/root-password-crypted option and a password hash
instead of a clear text password if you're planning to keep the VM.
Timezone
Set a suitable timezone:
d-i time/zone string Europe/London
Note: Wikipedia has a list of tz database time zones:
Disk configuration and Grub
For this post the following config was used to partition the VM's disk:
d-i partman-auto/init_automatically_partition select biggest_free
d-i partman-auto/disk string /dev/sda
d-i partman-auto/method string regular
Grub also needs to be installed on the disk, this can be done with the following config:
# This is fairly safe to set, it makes grub install automatically to the MBR
# if no other operating system is detected on the machine.
d-i grub-installer/only_debian boolean true

# Due notably to potential USB sticks, the location of the MBR can not be
# determined safely in general, so this needs to be specified:
d-i grub-installer/bootdev  string /dev/sda
Software installation
Make sure the apt mirror is enabled, and select which packaged groups you want to install:
d-i apt-setup/use_mirror boolean true
tasksel tasksel/first multiselect standard
Additional packages can also be installed if required:
d-i pkgsel/include string curl
Debian popularity contest
Finally choose if you want to contribute statistics to the Debian popularity contest:
popularity-contest popularity-contest/participate boolean false
Remove the CD from apt
Before restarting the VM, make sure the cdrom repo is not configured in
/etc/apt/sources.list:
d-i preseed/late_command string sed -i '/^deb cdrom:/d' /target/etc/apt/sources.list
Note: the partitioned disk is mounted under /target/ during installation.
Installation
There are a few ways you can get the preseed file to the VM being build. For this post the file is going to be served over HTTP:
$ python -m http.server 80
Serving HTTP on 0.0.0.0 port 80 (http://0.0.0.0:80/) ...
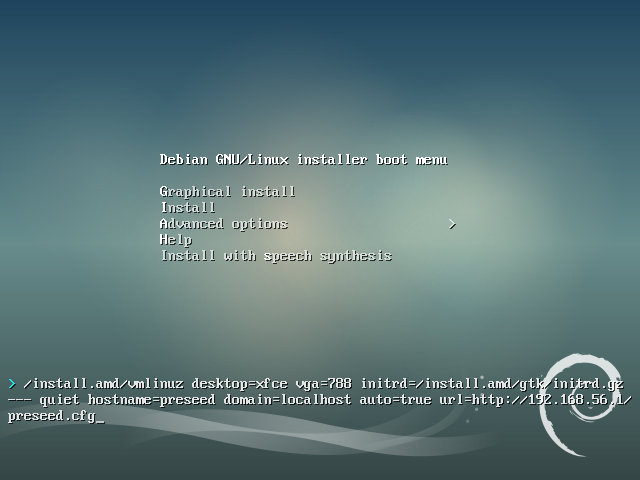
Once a temporary web server is running to serve the preseed config, boot the VM from a Debian ISO. Press Tab to edit the boot arguments and add the following:
hostname=preseed domain=localhost auto=true
url=http://192.168.56.1/preseed.cfg
The Grub menu should now look similar to the following:
From here you should be able to hit Enter to start the installation. If everything goes well you should be able to make a cup of tea can come back to a completed Debian installation.